
Johnson Space Center
Data Link System
Mission Planing
Data Update
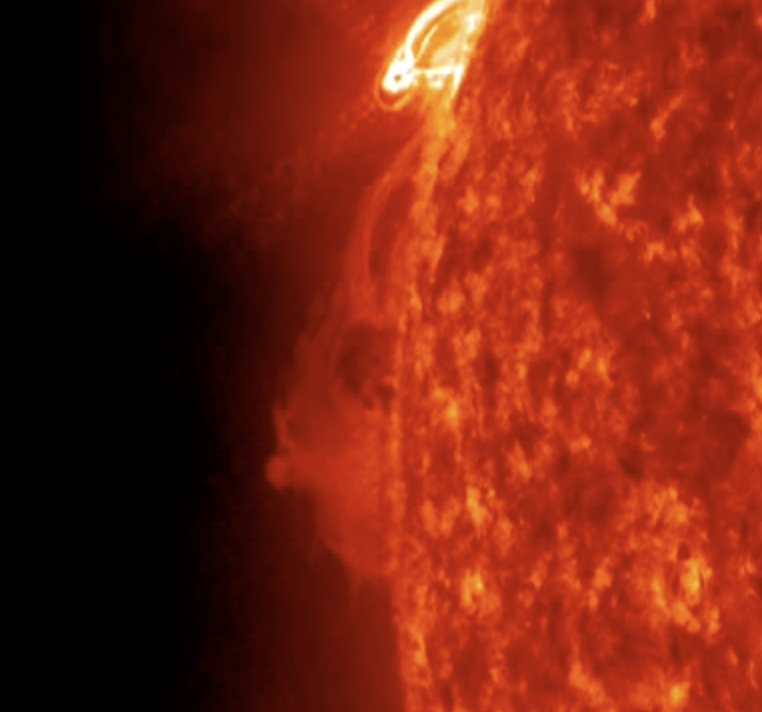
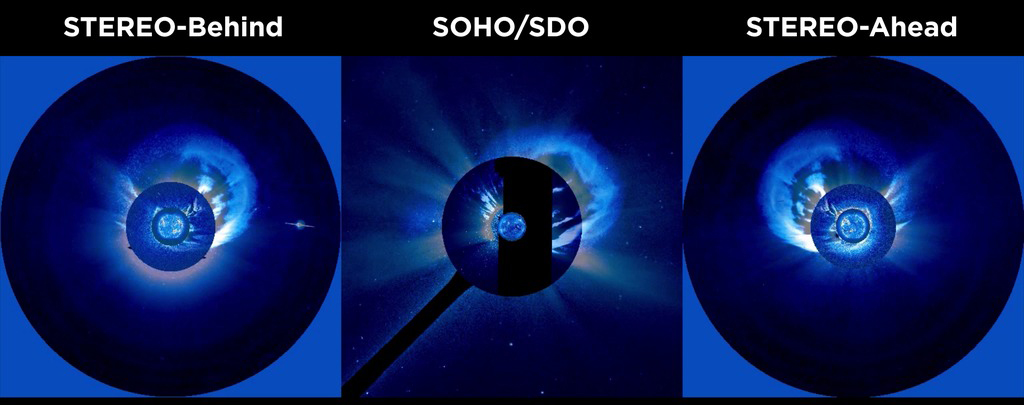
Alert: Violent Solar Storm Detected
Source: NASA Goddard Space Flight Center
Severity: High
A violent solar storm has been detected emanating from the Sun's surface, posing a significant threat to space operations and technology on Earth. This storm is characterized by intense bursts of radiation, solar flares, and heightened geomagnetic activity.
- Satellite Disruption: Communication and navigation satellites may experience disruptions or malfunctions due to increased radiation levels and electromagnetic interference.
- Power Grid Vulnerability: Geomagnetic storms can induce electrical currents in power grids, potentially leading to widespread blackouts and damage to electrical infrastructure.
- Aurora Activity: Increased aurora activity is expected at higher latitudes, potentially disrupting radio communications and GPS signals.
- Spacecraft Risk: Unprotected spacecraft and astronauts in orbit may be exposed to higher levels of radiation, posing risks to both crew and equipment.
Stay Informed: Continue monitoring updates from NASA Goddard Space Flight Center and relevant space weather agencies for the latest information and advisories regarding this solar storm event.
Safety First: Take necessary precautions to ensure personal safety and the integrity of critical infrastructure during this period of heightened solar activity.
Event: Extra-Vehicular Activity (EVA) Time Adjustment
Update Summary: In a recent development aboard the International Space Station (ISS), the timing for the scheduled Extra-Vehicular Activity (EVA) has been adjusted to optimize operational efficiency and crew safety.
Details: Following a thorough review of mission objectives, crew readiness, and orbital dynamics, mission control has determined the optimal window for conducting the EVA. The adjustment ensures that astronauts can perform their tasks with maximum effectiveness while minimizing potential risks associated with spacewalking activities.

Stay tuned for further updates and live coverage of the EVA proceedings as astronauts venture into the vacuum of space to carry out their mission objectives. Follow our official channels for real-time updates and exclusive insights into life aboard the International Space Station.
Event: Weekly Mission Plan Overview
Update Summary: As the International Space Station (ISS) enters a new week of operations, mission control has finalized the comprehensive plan outlining key objectives, experiments, and activities for the upcoming week.
Details: The new week plan reflects a collaborative effort between mission control and the ISS crew to prioritize scientific research, maintenance tasks, crew well-being, and operational efficiency. Each activity has been meticulously scheduled to maximize productivity while ensuring the safety and welfare of the astronauts aboard the station.
Event: Routine Airlock Leak Check
Update Summary: In adherence to standard safety protocols, the crew of the International Space Station (ISS) is conducting a scheduled airlock leak check to ensure the integrity of the station's pressurized environment and the safety of all crew members aboard.
Details: The airlock leak check is a routine procedure designed to verify the airtight seal of the ISS airlock before and after any extravehicular activities (EVAs) or cargo transfers. It involves a meticulous examination of the airlock's seals, valves, and mechanisms to detect any potential leaks that could compromise the station's atmosphere.
Procedure Overview:
- Preparation: Crew members meticulously prepare the airlock for the leak check procedure, ensuring that all necessary equipment and tools are readily available.
- Seal Inspection: The crew carefully inspects the seals and gaskets of the airlock doors for signs of wear, damage, or degradation that could affect their effectiveness in maintaining a tight seal.
- Pressure Testing: The airlock is pressurized to a specified level, and pressure readings are monitored closely to detect any deviations that may indicate a leak in the system.
- Leak Detection: Advanced sensors and instruments are utilized to detect even the smallest variations in pressure within the airlock, enabling the crew to pinpoint and address any potential leaks promptly.
- Verification: Upon completion of the leak check, the crew verifies that the airlock has maintained its pressure integrity within acceptable limits, confirming the successful completion of the procedure.
Dear Astronaut Lin,
I hope this message finds you well. My name is Nattanon Dungsunenarn, and I serve as the Editor-in-Chief of Spaceth.co, a leading space exploration news platform based in Thailand. We are dedicated to providing our audience with insightful coverage of the latest developments and missions in space exploration.
I am writing to request an exclusive interview with you aboard the Lunar Gateway for an in-depth discussion about your experiences, mission objectives, and contributions to the ongoing efforts in lunar exploration.
Our audience is eager to learn more about the groundbreaking work being conducted aboard the Lunar Gateway and the significance of this mission in advancing humanity's exploration of the Moon and beyond. Your perspective as an astronaut serving on this historic mission would provide valuable insights and inspiration to our readers.
The interview can be conducted remotely via video conference or any other communication method that is convenient for you and your team aboard the Lunar Gateway. We are flexible and willing to accommodate your schedule to ensure a smooth and successful interview experience.
We believe that sharing your story and experiences with our audience will not only enrich their understanding of lunar exploration but also inspire future generations of space enthusiasts and aspiring astronauts.
We kindly request your consideration of this interview request and would be honored to have the opportunity to feature your insights on Spaceth.co.
Please let us know your availability and preferred method of communication for the interview, and we will make the necessary arrangements accordingly.
Thank you for your time and consideration. We look forward to the possibility of collaborating with you and sharing your journey with our audience.
Warm regards,
Nattanon Dungsunenarn Editor-in-Chief Spaceth.co
Procedure Steps:
- Pre-Installation Preparation: a. Verify that all non-essential systems and applications are shut down to minimize potential conflicts during the software update. b. Ensure sufficient power supply and system resources are available to complete the update process without interruption.
- Software Update Installation: a. Initiate the software update installation process on each computer and system according to the established update sequence. b. Follow the on-screen prompts and instructions provided by the update wizard to proceed with the installation. c. Monitor the progress of the update installation and address any error messages or issues encountered during the process.
- Verification and Testing: a. Upon completion of the software update installation, conduct a series of functional tests and system checks to ensure that all applications and functionalities are working correctly. b. Validate the integrity of critical system components and data interfaces to confirm that they are operating as expected after the update.
- Post-Installation Validation: a. Document the details of the software update installation, including the version number, update date, and any relevant notes or observations. b. Verify that all necessary configurations and settings have been retained and are compatible with the updated software environment. c. Notify ground control of the successful completion of the software update installation and provide status updates as required.
Procedure Steps:
- Shutdown and Decommission: a. Safely power down the existing instrument, following established shutdown procedures to avoid any potential damage. b. Decommission the instrument by disconnecting power and data cables, ensuring proper labeling for reinstallation or disposal.
- Preparation of Replacement Instrument: a. Unpack the upgraded instrument provided by JPL, ensuring all components are intact and undamaged. b. Conduct a preliminary inspection of the replacement instrument to verify its functionality and compatibility with the ISS interface.
- Instrument Installation: a. Position the replacement instrument at the designated installation site, aligning it with the mounting brackets and interface connectors. b. Secure the instrument in place using appropriate fasteners and locking mechanisms, ensuring a snug fit to prevent any movement during operation.
- Connection and Integration: a. Connect power and data cables to the corresponding ports on the replacement instrument, following the color-coded or labeled indicators for proper alignment. b. Conduct a thorough check of all connections to ensure they are secure and properly seated, minimizing the risk of electrical or data transmission issues.
- Verification and Testing: a. Power up the replacement instrument and verify its initialization sequence, ensuring all subsystems are functioning as expected. b. Conduct a series of diagnostic tests and calibration procedures to validate the performance and accuracy of the new instrument. c. Transmit test data to mission control and JPL engineers for real-time analysis and verification of instrument functionality.
- Post-Installation Checks: a. Perform a final inspection of the installation site and surrounding area to ensure no debris or loose hardware remains. b. Document the replacement procedure, including any deviations or observations encountered during the process, for future reference and analysis.
Preparation:
- Gather all necessary tools, equipment, and safety gear required for the installation procedure.
- Review the technical specifications and installation guidelines provided by NARIT for the X-Ray detector.
- Coordinate with mission control and NARIT engineers for guidance and support throughout the installation process.
Procedure Steps:
- Pre-Installation Preparation: a. Ensure that the designated installation site on the Lunar Gateway is clear of any obstructions and accessible for the installation crew. b. Conduct a safety briefing for all personnel involved in the installation procedure, emphasizing the importance of adherence to safety protocols and procedures.
- Unpacking and Inspection: a. Unpack the new X-Ray detector from its packaging, taking care to handle it gently to avoid any damage to sensitive components. b. Conduct a thorough inspection of the X-Ray detector to verify its integrity, functionality, and compatibility with the Lunar Gateway's interface and mounting systems.
- Mounting and Installation: a. Position the X-Ray detector at the designated installation site, ensuring proper alignment with the mounting brackets and interface connectors. b. Secure the X-Ray detector in place using appropriate fasteners and locking mechanisms, ensuring a snug fit to prevent any movement or vibration during operation. c. Connect the power and data cables to the corresponding ports on the X-Ray detector, following the color-coded or labeled indicators for proper alignment.
- Integration and Testing: a. Power up the X-Ray detector and verify its initialization sequence, ensuring all subsystems are functioning as expected. b. Conduct a series of diagnostic tests and calibration procedures to validate the performance and accuracy of the X-Ray detector. c. Transmit test data to mission control and NARIT engineers for real-time analysis and verification of detector functionality.
- Post-Installation Checks: a. Perform a final inspection of the installation site and surrounding area to ensure no debris or loose hardware remains. b. Document the installation procedure, including any deviations or observations encountered during the process, for future reference and analysis.
Johnson Space Center
NASA WiFi Connect
Preparation:
- Ensure that the device you wish to connect is Wi-Fi enabled and compatible with the Lunar Gateway network protocols.
- Familiarize yourself with the Lunar Gateway Wi-Fi network name (SSID) and password provided by mission control.
Display Connected Devices